We help create smiles, happiness, and lifelong memories to people’s lives through fun, safe, and unforgettable entertainment
Vision:
To be the industry leader recognised by WorkSafe, safety inspectors, and insurance bodies as the gold standard in safety, rigorous training, and exceptional customer experiences. We strive to set the benchmark for excellence, becoming the trusted name for safe, reliable, and memorable events across the industry.
Mission:
Perth Bouncy Castle Hire is dedicated to delivering exceptional event services through uncompromising safety standards and advanced training. Committed to establishing industry-leading practices within the next decade, we aim to build trust with clients, partners, and regulatory agencies by adhering to best practices and fostering continuous improvement, setting PBCH as the standard for safe, professional, and memorable event experiences.
WHY this Vision?
At Perth Bouncy Castle Hire, our vision is rooted in the belief that the event industry should be synonymous with safety, reliability, and munforgettable experiences. The entertainment and amusement space demands trust, especially when working with equipment that families and communities rely on for joy and memorable moments. By positioning ourselves as the industry leader in safety and training, we are not only committed to protecting our clients and the public but also to establishing a level of professionalism that makes PBCH the go-to name in the industry. This vision is fueled by our desire to positively shape the standards for event providers, so clients, inspectors, and insurers alike recognize PBCH as a company that goes above and beyond for safety and service. We believe this dedication will foster long-lasting partnerships, instil client confidence, and inspire our team to deliver excellence consistently. This is more than business—it’s about setting a legacy of trust, quality, and reliability.
Our “WHY” is simple: we want every event to be a model of safety and joy, where clients feel assured that PBCH will deliver not just fun but also peace of mind.
Our Promise:
To Lead with Safety: We make safety non-negotiable—it’s the foundation of trust.
To Deliver Reliability: We are the team that gets it right, every time.
To Create Unforgettable Moments: What we do leaves a mark on lives, creating memories that last.
Core Values
Safety First
Protect yourself, your teammates, and our clients. If something feels off, take action.
Amazing Customer Service
Go above and beyond. Turn good into AMAZING!
Unstoppable Teamwork
You are part of a Championship team. Collaborate, support, and inspire each other to achieve more together.
Integrity
Doing the right thing. Even when no-one is looking
Continuous Growth
Embrace training, learn from mistakes, and push yourself to improve every day.
Responsibility
Take pride in your role. What you do matters – own it!
Sometimes, you may encounter difficult patrons. These are usually groups of teenagers.
Use Body Block and waving arms for more effective crowd control. (position your body in front of the patron and spread your arms out)
Always use a stern voice, but do not be rude. Let them know you are in charge.
Always get their full attention so they know you are talking to them.
Give children 1-3 warnings depending on the severity of the incident.
And Yes, you are allowed to ban or timeout people from playing on the equipment if you feel they are being a danger to others and themselves. Your main goal is to make sure no one gets hurt.
If the crowd gets aggressive you are permitted to shut things down
Team leader to split into team into groups of 2 or 3.
Allocate group leaders.
Allocate which group is packing down which equipment
Identify central location for where the small and misc equipment will be placed. You may need to identify a few depending on how spread out the equipment is.
PACK DOWN PROCESS
Deflate the inflatable and pull the edges in. DO NOT FOLD AND ROLL YET
Remove stakes and unclip sandbags. If metal stakes, place in the allocated central location.
Fold inflatable and let air out
Pack away all the small miscellaneous things and place in the central location (blower, leads, barricades and barriers, grass mats, safety mats, bollards) – MAKE SURE IT IS SORTED INTO INDIVIDUAL PILES. DO NOT JUST PUT IT ANYWHERE.
Bring sandbags to central location.
Roll the inflatable, tie it up and leave it there. (ALWAYS ROLL FRONT TO BACK)
Help others, but remember to follow this exact procedure.
LOADING UP ONTO THE TRUCK
Team Leader will then bring the truck in for loading. Drive around to pick up each inflatable if set up is spaced out.
Load up inflatables first.
Finish off with small miscellaneous things and sandbags.
Team leader to split into team into groups of 2 or 3.
Allocate group leaders.
Allocate which team is setting up which equipment based on experience.
Team leader and group leaders to identify where each equipment will be placed.
Identify power and/or water source
UNLOADING FROM TRUCK
Take out the small miscellaneous things and place in the central location (blower, leads, barricades and barriers, grass mats, safety mats, bollards) – MAKE SURE IT IS SORTED INTO INDIVIDUAL PILES. DO NOT JUST PUT IT ANYWHERE.
Team Leader to drive around and drop all the inflatables in their positions.
SET UP
Unroll inflatable and confirm position of entry and exit points are suitable
Connect power and blower. Ensure no trip hazards.
Zip it all up
Inflate
Install anchors
Mats into position
Barriers around blower and generators
Clean and sanitise
Set Up Metal barriers, safety signs, banners, grass mats over cords
Double check everything is secure, clean and safe.
Space Required and Clearance (access and set up location)
Hazards and interference (trees, holes, furniture, vehicles, people, trip hazards)
Underground piping
Power (distance, location) Avoid connecting more than 2 extension cords together.
Avoid sharing power with other devices. Maximum 2 devices per power point.
Water (distance, location) (APPLICABLE TO WATER GAMES ONLY)
Position – identify front, back, entry, exit points of the unit. Make sure kids do not exit into the wall or any dangerous objects.
SET UP
Start from the back, and roll out to the front.
Secure blower
Secure zips, velcros and blower tubes so no air can escape.
Connect power and make sure there is no trip hazards. Use grass mats, cable covers, secure them with tape or hide them to avoid trip hazards.
Inflate. Keep watch to make sure the inflatable does not catch onto anything on the way up. On windy days, you may need to anchor a few points first before inflating.
Anchor with metal stakes or sandbags. Make sure to avoid reticulation. NOTE: if set up is on grass, always ask the customer where the reticulation pipes are.
Use tie down ropes on slides, obstacle courses and other tall units when required.
Set up crash mats around the entry and exit points.
Vacuum and disinfect.
Set up barriers around the blower
Set up barriers around the front for crowd control and line management.
Sign Checklist and Hire Agreement Form
TAKEDOWN
Vacuum and disinfect.
Turn off blower
Unzip, untie blower tubes and velcro
Pull all walls towards the middle. Start with the sides, then finish off with the back.
Remove stakes or sandbags.
Remove as much air as you can by stepping on it.
Fold in 3 OR 4 sections. The less folds, the taller the unit will be when rolled up. More folds, will result in short and stumpy. Sometimes you can do 3.5 folds etc.. Goal here is to make sure it fits inside your vehicle afterwards.
Keep stepping to remove air, or fold in half and keep stepping on it.
Start rolling. Keep it tight at all times and make sure edges are straight. If its not straight, it will be hard to stand up when its rolled up.
Your main goal is to make sure no one gets hurt. Do not favour anybody. All rules apply to everyone. All patrons need to feel you are in control. Use a stern voice, but do not ever be rude or man handle any children. Always be friendly and smiling. Do not have your hands in your pocket. You must always be alert and reactive. Do not sit down.
Who is not allowed on this game?
do not allow anyone with previous injuries on this equipment
do not allow any pregnant or people with disabilities on this equipment
do not allow children aged 5 years and under on this equipment
Tell all patrons the safety rules:
no somersaults
no tackling or rough play
no climbing walls
no pushing in
remove all footwear
remove all sharp or hard objects such as pens, buckles, spectacles
no food or drinks
Remember many young users can’t read signs so you will need to tell them what they are.
How To Play The Game and Get Them Ready
2 patrons racing each other with a velcro batton (blue and red). The patron who reaches the furthest, wins!
Assist each patron by putting their harness on. Ensure the shackles are wound up hand tight (this can come loose after few sessions)
Double check harness is installed correctly and tug on it a few times to make sure.
After patrons are strapped on properly, the supervisor should be stationed at the entrance of the bungee run then call out “ready set go” to start the game.
Once the game has finished, you will need to walk up to the players and help them take off the harness.
How Many Patrons Can Play Each Session
Maximum 2 at any one time.
Make sure everyone is off the inflatable before the next session starts. This helps to control the flow of the line during peak periods.
Where Should The Supervisor Be Standing?
We recommend the supervisor to be stationed right at the entrance of the inflatable to control the line.
The supervisor at the front should always be standing close to the steps to ensure the kids do not fall off the step and no one sneaks in.
Pay careful attention to the weather conditions. Wind is the enemy of bouncy castles.
How Long Should We Allow For Each Session?
If the event is busy, keep to 1 race per session.
Watch the activity of patrons constantly and remove those who disobey your instructions. Use a whistle or similar warning as a way to attract attention should any misbehavior occur.
How To Deal With Difficult Patrons
Sometimes, you may encounter difficult patrons. These are usually groups of teenagers.
Use Body Block and waving arms for more effective crowd control. (position your body in front of the patron and spread your arms out)
Always use a stern voice, but do not be rude. Let them know you are in charge.
Always get their full attention so they know you are talking to them.
Give children 1-3 warnings depending on the severity of the incident.
And Yes, you are allowed to ban or timeout people from playing on the equipment if you feel they are being a danger to others and themselves. Your main goal is to make sure no one gets hurt.
If the crowd gets aggressive you are permitted to shut things down
EMERGENCY SITUATIONS
What To Do If Someone Gets Hurt
Stop all activity.
Report to onsite medic, or whoever is in charge of the event.
Only resume once the patron has been cared for.
Report all incidents to management.
The supervisor of the inflatable must always be alert to weather conditions:-
What To Do If It Rains:
In wet weather, do not turn off the blower. Cover the blower and electricals using the bag provided at the back of the inflatable.
After the rain settles, you will need to wipe down the inflatable with towels before use to avoid the patrons slipping.
What To Do If It’s Windy:
If wind speeds exceed 30kmh or signs of willy winds approaching, evacuate the patrons from the inflatable immediately.
Turn off the power and allow it to deflate. To speed up the process, some inflatables have velcro zips, where you can unzip the sides to let the air out.
What To Do If The Inflatable Deflates:
Check the blower ventilation to make sure nothing is blocking the fan. Objects such as balloons, leaves, plastic bags or party strings can sometimes be the cause of this.
Check the blower tubes to make sure it hasn’t come undone.
Check the velcro zips to make sure it hasn’t come undone.
Check the blower switch and power point to make sure it hasn’t been tampered with.
Check the extension cords to make sure it hasn’t come apart or been damaged.
Check the mains power or generator to make sure it hasn’t tripped.
If all fails, please call the Ken on 0406 161 959 or one of the trained operators on site.
Generator Problems and How To Fix It
Pull String has snapped
Check if you have time to drive back to the warehouse to get one? If not, Call management immediately on 0421 464 018. If you can’t get a response, contact the other drivers and ask if they are close by?
Call a local hire company and hire a generator (minimum 3kva for each inflatable). Try Coates hire, kennards hire. Google “Generator Hire” or “generator hire perth”. If you can pay for this first, we can re-imburse you, if not tell management who the company is to arrange payment.
Generator Doesn’t Start
Check the fuel
Check the start button (usually red button or lever) has been switched on
Check fuel has been switched on
Check safety switch is turned on
Start on CHOKE, If the blower is starting on cold engine. If the engine has been warmed up, put the lever to RUN mode (rabbit)
Call Management
If the generator started, but after you turned on the blower, it turned off, flick the safety switch back up and start the engine again.
If it really doesn’t start, check if you have time to drive back to the warehouse to get one? If not, Call management immediately on 0421 464 018. If you can’t get a response, contact the other drivers and ask if they are free to drop it off for you.
Call a local hire company and hire a generator (minimum 3kva for each inflatable). Try Coates hire, kennards hire. Google “Generator Hire” or “generator hire perth”. If you can pay for this first, we can re-imburse you, if not tell management who the company is to arrange payment.
The generator starts, but the blower keeps tripping it
Have you got the correct generator for the blower? Any 2HP Blowers require our biggest generator.
Turn the safety switch back on.
Warm it up longer and try again
If it trips again and the generator has been warmed up, turn the safety switch back on, keep the blower plugged in with the switch on and pull the string to start the engine.
You can also try this: Turn the safety switch back on and turn the generator back on. Keep you finger on the safety switch to prevent it from flicking off switch and turn on the blower.
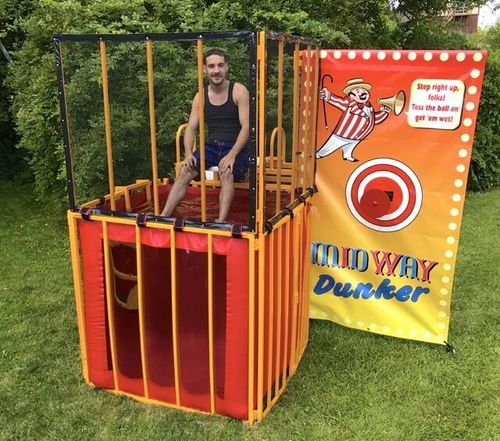
The Dunk Tank must always have an adult operator on duty when in use.
NEVER LEAVE A DUNK TANK FILLED WITH WATER UNATTENDED! When tank is going to be unattended, always drain water.
How To Supervise The Dunk Tank
An Adult must supervise this amusement at all times. Children are not allowed to supervise the dunk tank.
The supervisor must be at standing at the entry point of the unit.
Have the participant’s line up in an orderly line
Please ensure the participants have no: shoes, jewellery, glasses, food and drinks
MAX Participants is: 1 Ball thrower / 1 person to be dunked
Allow participants to enter the unit via designated entry point ONLY
Keep water level at least 20cms from the top of the tank.
Only one person at a time is allowed on the seat or in the tank.
Keep all non-swimmers out of the tank.
No person weighing over 100kgs to be on the seat.
Please use all caution when exiting the tank as the steps may become slippery.
Only use the supplied balls to hit the target.
Do not hit target with hands.
Before (and each time) the participant climbs onto the seat, the supervisor must first make sure the seat is securely locked in place and that the safety latch is engaged.
Never let the participant stand, kneel or bounce on the seat.
When being dunked, keep hands on knees and sit forward. This will prevent anyone hitting their head on the seat.
The participant must move toward the front of the tank when coming up out of the water to avoid hitting their head on the seat.
The participant should use the handles to assist in climbing out of the tank and forgetting back up onto the seat after being dunked. However, the participant must not hold onto the handles while being dunked.
Make sure that no-one is blocking entry / exit points
Once the participants have finished their turn, they are to return to the end of the line.
Who Is Not Allowed On The Dunk Tanks
No person weighing over 100kgs to be on the seat.
Non-swimmers are not allowed to participate in this game.
Do not allow any pregnant, people with disabilities on this equipment
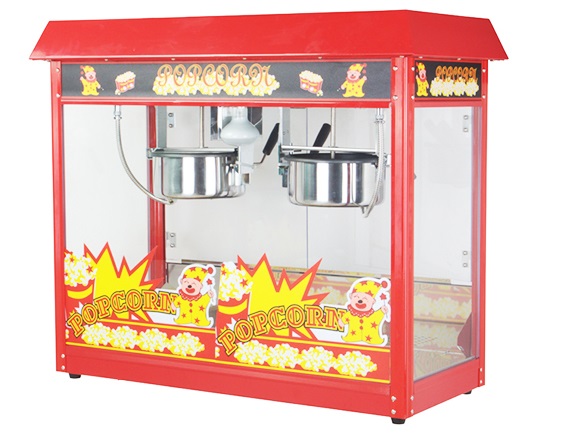
Always tie your hair up or wear a hat. You must always wear gloves when working with food. Always smile and have fun!
STEP 1:
STEP 2:
Setting Up
Place Machine on a flat, stable surface.
Place a bin next to you
Place the buckets of kernels and popcorn boxes close to you.
Wear gloves, hair is out of the way. Smile and your ready to go!
Ready to Make Popcorn
Power On – this will turn on the warmer and the light
Turn the Heat On
Turn on the Spinner
Add Popcorn Oil
Add Kernels
Close The Lid and wait 3-4 minutes until its 90% popped.
Once you hear it pop less frequently you can empty the pot and make the next batch. (if you are no longer serving anymore, turn off the heat)
NEW UPDATE: We no longer put the salt in cup, we have a salt shaker now. Sprinkle popcorn salt, and serve.
IMPORTANT: Be careful not to burn the popcorn. This happens if you leave it in the pot for too long. The best way to avoid this is Once you hear it pop less frequently., Turn the HEAT off. If you ever do burn popcorn, throw it in the bin. DO NOT MIX BURNT POPCORN WITH THE FRESH BATCH.
To ensure good production of popcorn, it is important you make the next batch before serving. This ensures there is always something cooking.